If you’ve ever opened Canva intending to create a quick graphic, only to lose 20 minutes searching for a past design, you’re not alone.
For many business owners, Canva has become an essential part of their marketing workflow, but also an unexpectedly messy one.
And while Canva makes it easy to create, it doesn’t exactly guide you when it comes to staying organized.
One of the most common questions I get is whether you can organize your Canva homepage.
The short answer is: not really.
Your home screen will always show a rolling list of your designs, with the most recently used/edited files at the top — you can’t create a folder from the homepage or move items to a folder.
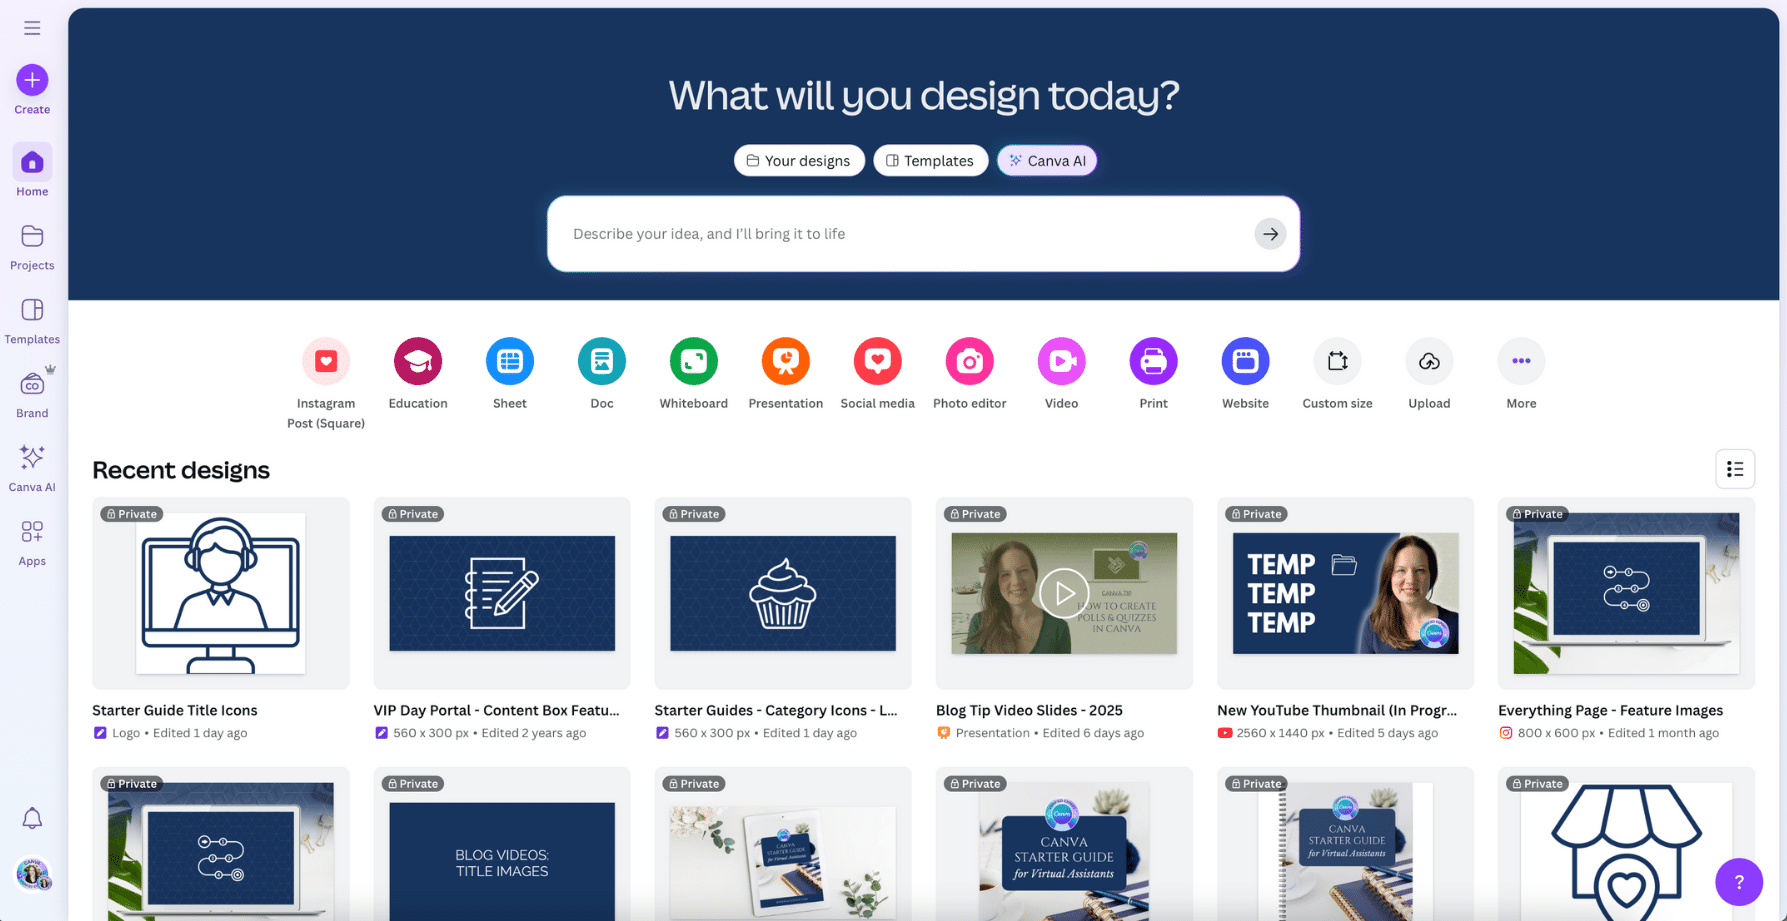
But you do have complete control over organizing your content in the Projects section inside of your Canva account.
That’s where you can create custom folders, move your designs and images into meaningful categories, and truly take charge of your Canva workspace.
When you know how to use these features, it’s not just effective — it can completely change how quickly and confidently you work in Canva.
Why Canva Organization Matters (Even If You’re a Solo Business Owner)
An organized Canva account isn’t just about having things look tidy, it’s about making your work easier.
When your workspace is clean and logical:
- You stop wasting time looking for files
- You can delegate more easily to a VA or team member
- You reuse assets instead of recreating them from scratch
- You keep your visuals consistent with your brand
Canva doesn’t create chaos on purpose. It’s just that most people aren’t shown how to set up a system in the first place.
As a Canva Verified Expert who specializes in Canva organization, I’ve taught or worked with thousands of business owners who are drowning in designs, uploads, and templates. It doesn’t take a complicated system to get organized.
You just need a structure that makes sense for you… and a plan to maintain it.
Essential Canva Features That Help You Stay Organized
Before we dive into specific strategies, it’s worth taking a moment to understand what Canva already offers to help you stay organized. These built-in features are available to both free and Pro users, and we’ll be referring back to many of them throughout the rest of this article.
If you’ve been struggling with how to organize Canva or wondering if it’s even possible to tidy things up, these three tools are key:
Custom Folders in Canva
Canva’s custom folders allow you to organize your designs, images, templates, and other assets into logical groupings. You’ll find them by navigating to the Projects tab from the left-hand menu and inside Projects, you can view all your folders in the main area.
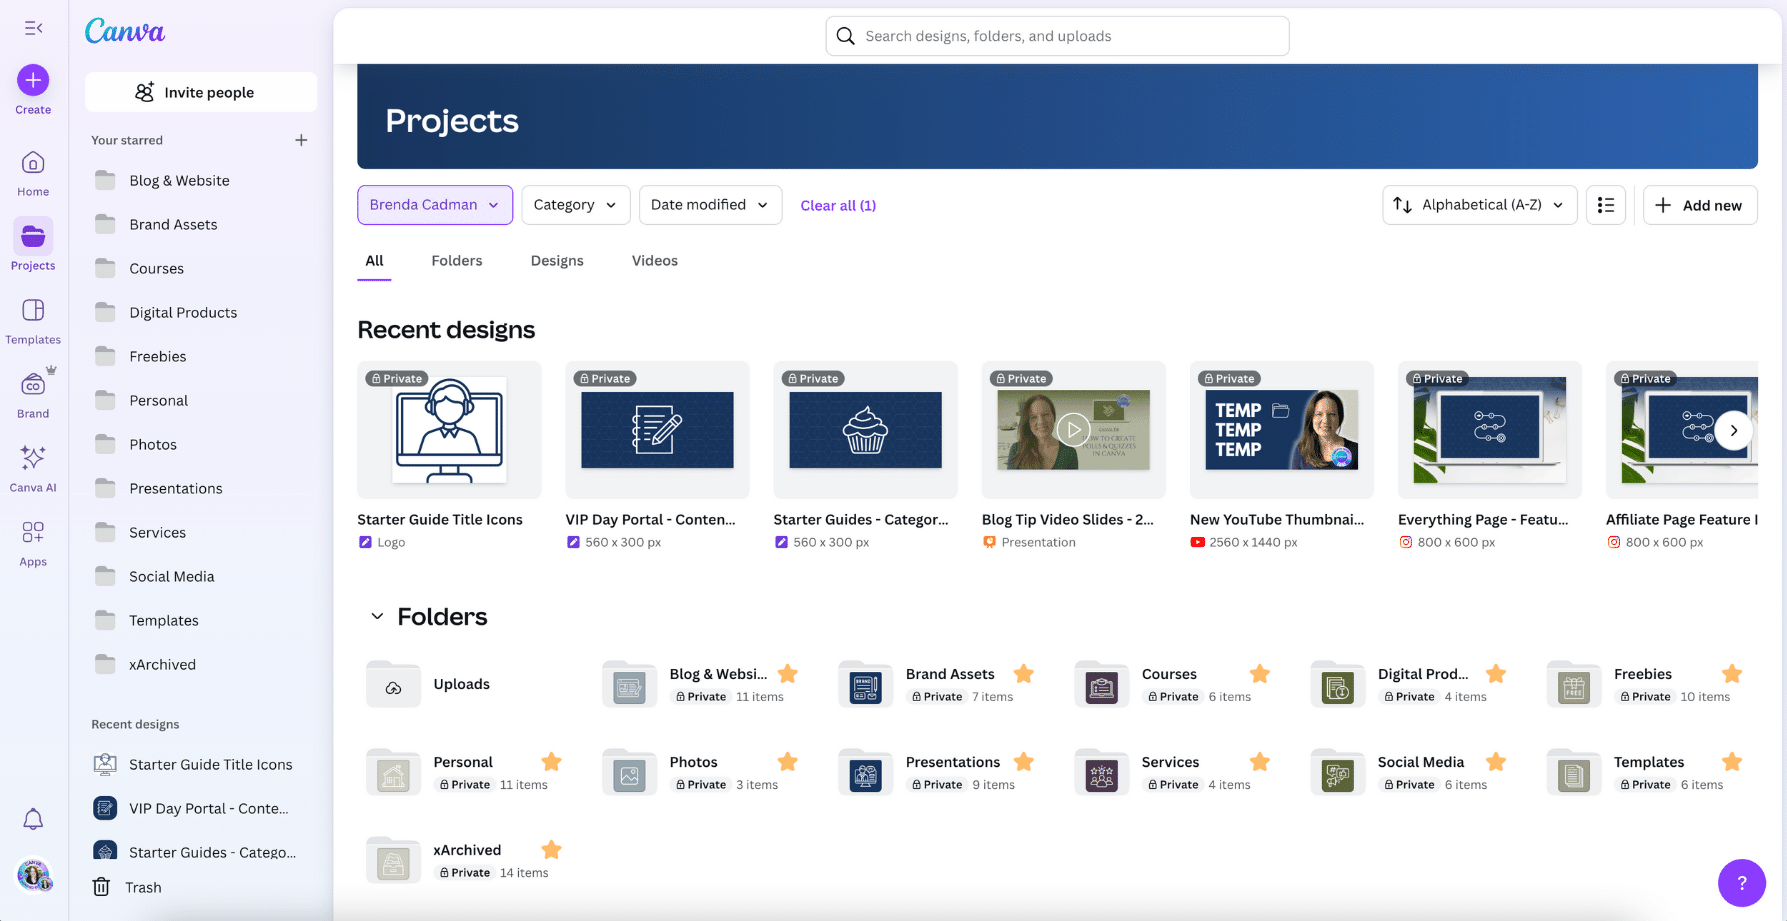
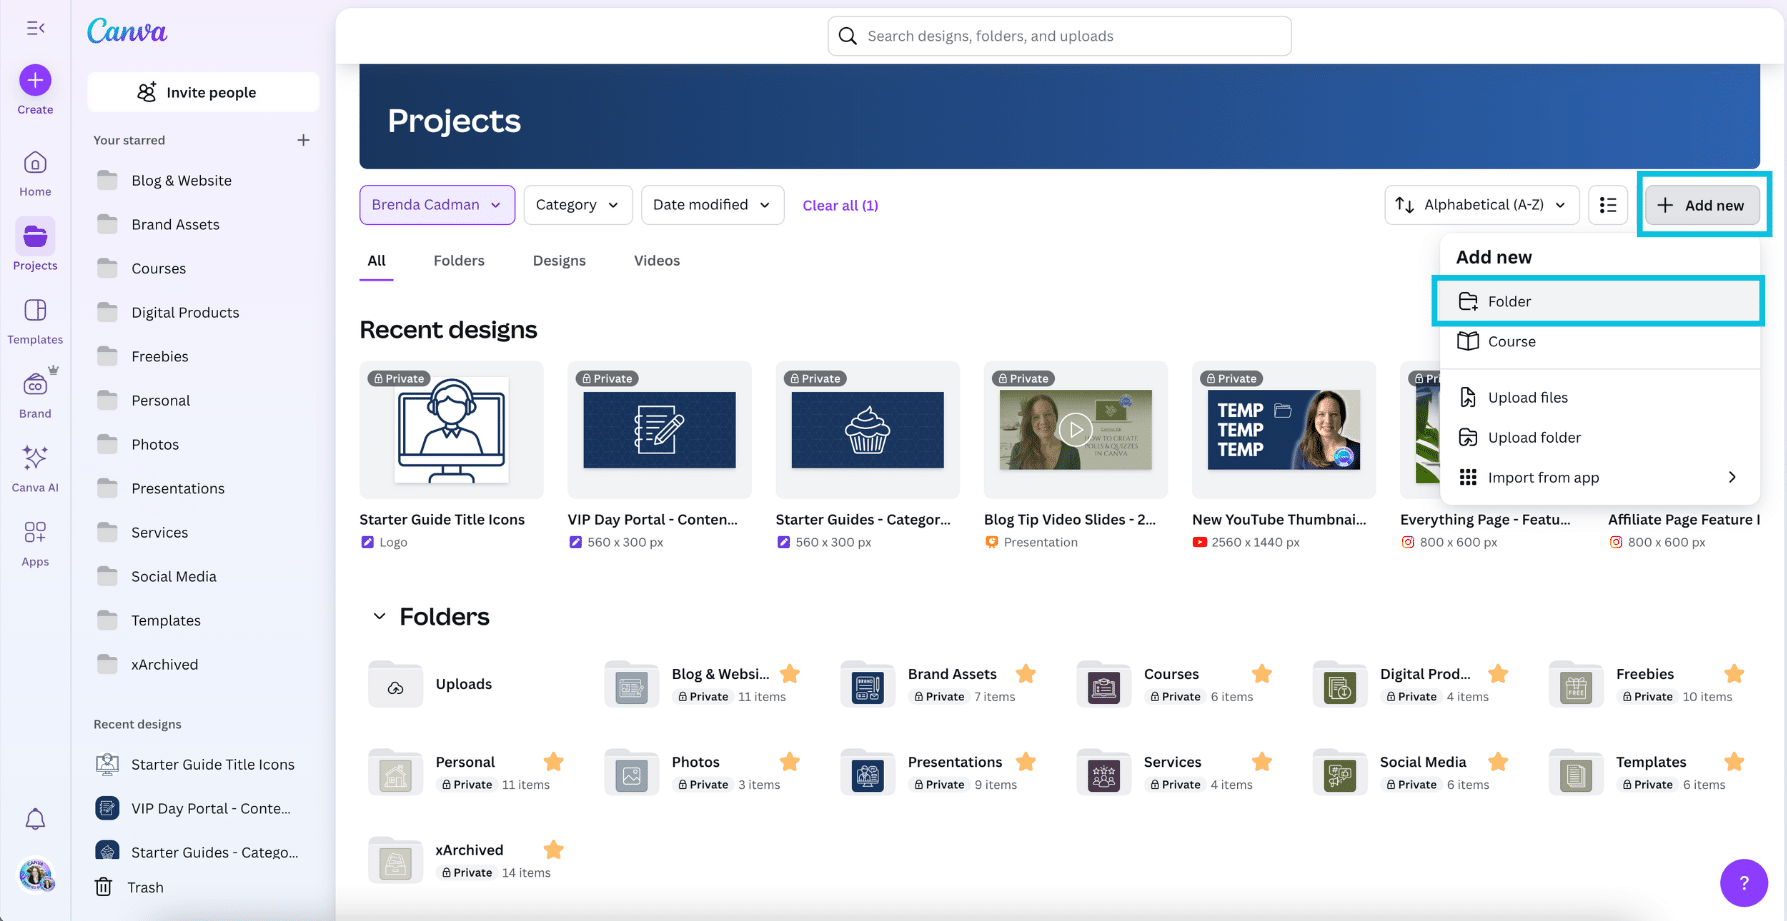
To create a new folder, click the Add New button in the upper-right corner and select Folder. Name your folder based on its contents, for example, “Clients,” “Social Media,” or “Lead Magnets.”
You can also create subfolders using the same process. Open the folder where you want the subfolder to live, then click Add New again and choose *Folder*. This is helpful when you want to group content by year, campaign, platform, or another topic within a broader category.
You can then drag-and-drop items into folders, or use the “Move to Folder” option from the three-dot menu on any file. Or you can also select multiple items (either by checking them off or by clicking and dragging across them) and then click the folder icon to move them all at once.
Starring Canva Designs and Folders
If there are certain designs or folders you return to again and again, Canva allows you to “star” them for easy access. To do this, hover over the design or folder and click the star icon that appears. It will turn yellow when selected, indicating that it’s been starred.
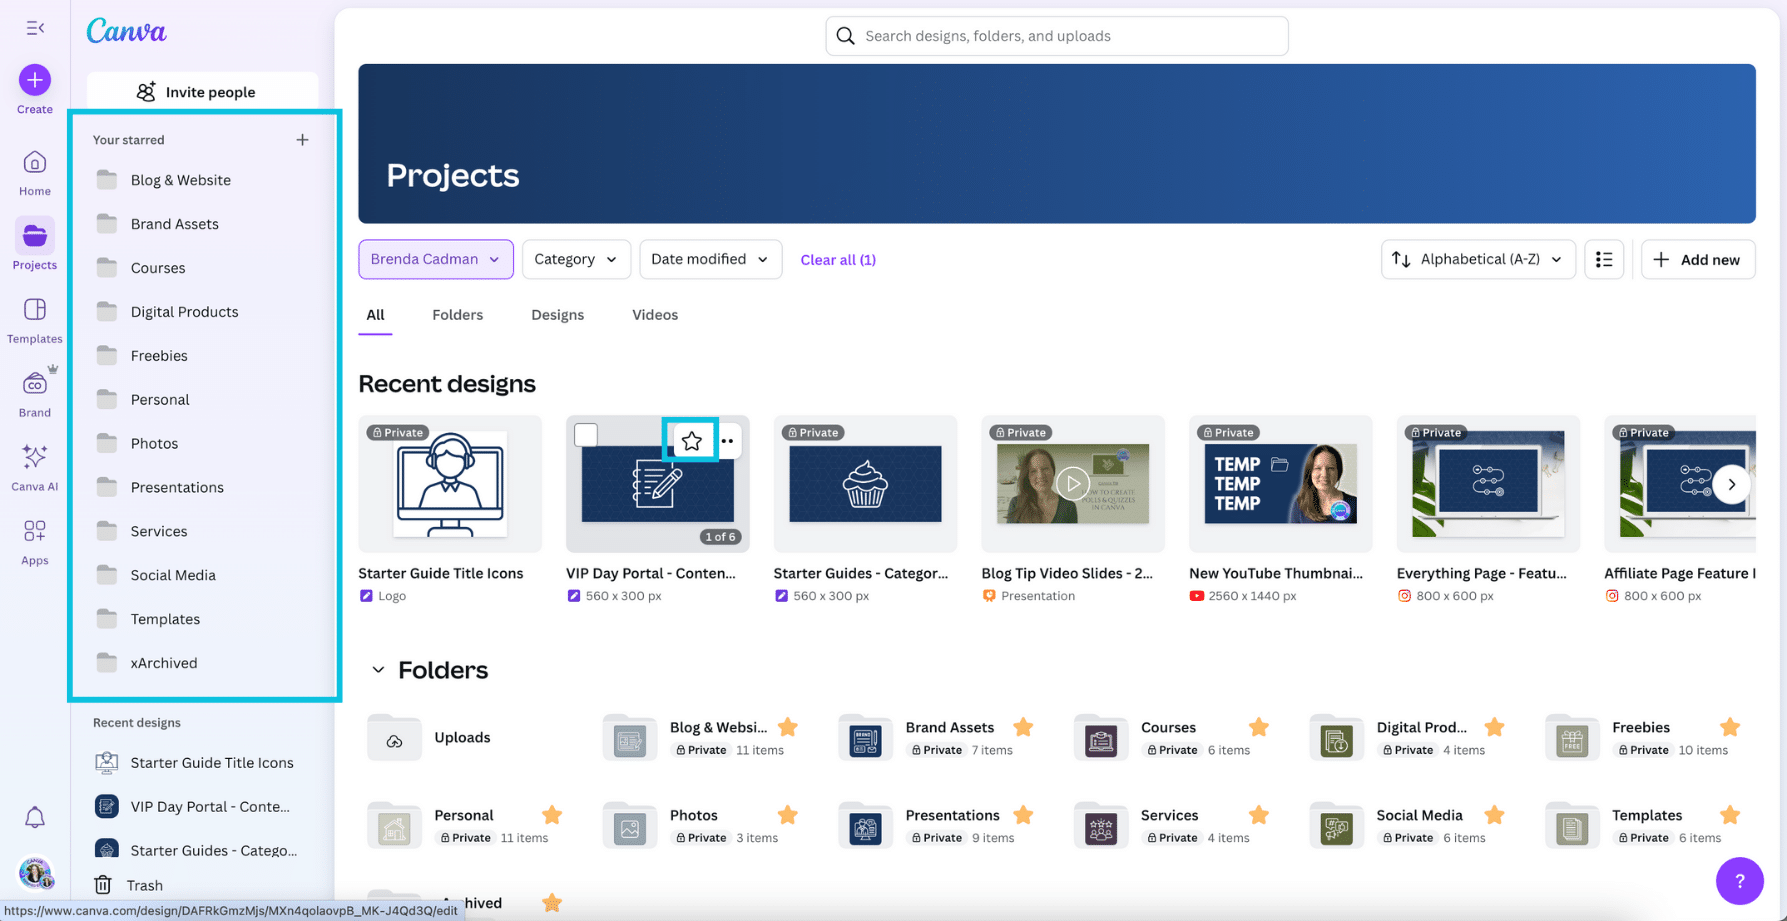
Starred items will appear in the left-hand navigation of your Canva dashboard and you can also create custom sections within the Your Starred area to group items in a way that makes sense for your workflow.
Some people organize by progress status, such as “In Progress,” “Waiting for Approval,” or “Completed.”
Others might create sections based on general categories like “Marketing” or “Templates,” or divide personal and business projects.
Personally, I use my Starred area to pin all of my primary-level folders so that I can access them quickly via the left-hand navigation without having to go into the main Projects area. That setup works well for my workflow, but it may not be the best approach for everyone.
I also like to create a short-term section at the top for time-sensitive projects. For example, during Black Friday I had a dedicated “Black Friday” section with starred designs related to my seasonal promotions and affiliate graphics.
The way you use Starred should be based on what helps you work more efficiently. These sections can also be reordered by dragging and dropping, allowing you to prioritize the ones you access most.
Search and Filter Options
Trying to track down a specific design, folder, or image in Canva can feel overwhelming, especially if you’ve got a lot of content in your account. Fortunately, Canva’s search feature has recently been refreshed, and the updated interface makes it much easier to find what you need using both keyword search and smart filtering.
From the Canva homepage, look just below the “What will you design today?” prompt and select the Your Content tab. This allows you to search your own designs, folders, and uploads by typing in a keyword or phrase.
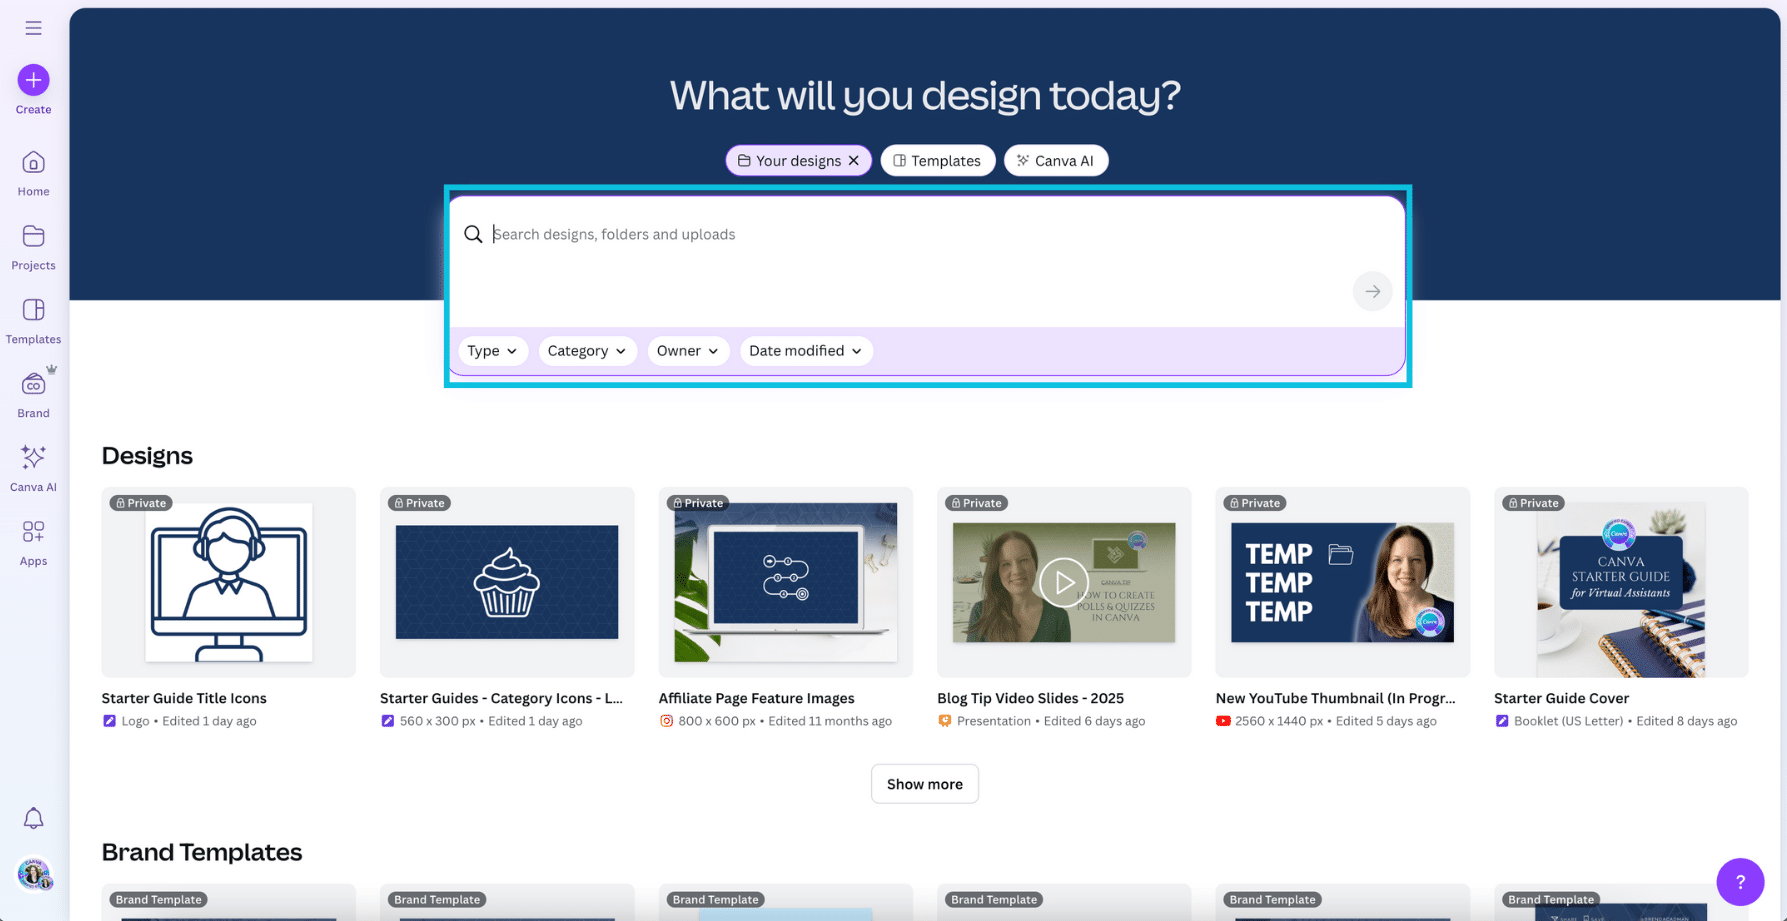
To narrow your search results, use the filters that appear beneath the search bar. You can filter by Type, Category, Owner, and Date Modified. These filters can be especially helpful when your search term is a common word or when you’re looking for something created recently or by a specific team member.
You can also search from the Projects tab and inside the design editor itself — just open the Projects tab in the left-hand panel of your editor and type into the “Search your content” field. This is especially useful when you’re in the middle of a project and want to quickly insert something you’ve already created or uploaded.
Whether you’re someone who thrives with a clear folder structure or someone who prefers to search as needed, mastering this feature will make your Canva experience faster and far less frustrating.
Together, these tools (folders, starring, and search) provide the foundation for organizing everything from your templates and uploads to your branded assets.
Let’s now take a closer look at how to put them to use.
Tip 1: Create a Canva Folder System That Reflects How You Work
Why You Should Organize Canva by Function, Not Format
If you’ve ever wondered how to organize Canva folders effectively, the answer is to build your structure around how your brain works, not how Canva labels things.
In other words, don’t feel like you need to organize your folders based on Canva’s default design sizes or template categories. Canva might offer formats like “Instagram Post” or “Presentation,” but that doesn’t mean you need separate folders for each file type. Instead, think about how *you* naturally search for your content.
Do you think in terms of projects, clients, campaigns, or content categories? That’s the lens you should use when creating your folder structure.
When planning your top-level folders, aim for broad categories that are general enough to grow with your business but specific enough to make it clear what belongs inside. For instance, a folder named “Misc Projects” doesn’t give you any clarity, but neither does having twenty separate folders for each campaign or product. It’s a balancing act.
How Many Canva Folders Do You Really Need?
As a general rule, I usually recommend having no more than 12 or 13 top-level folders, though you may not even need that many. What’s more important is that your folder system is intuitive for you. If it makes sense in your brain, you’re far more likely to use it consistently.
Avoid making overly specific folders top-level categories. For example, something like *Pinterest* probably isn’t broad enough to stand alone. A better approach would be to have a main *Social Media* folder with subfolders inside it for each platform.
Top-level folders should represent big-picture categories, with the more detailed organization happening inside those broader homes. That way, your structure stays manageable as your content grows, and it’s much easier to find what you’re looking for.
Examples of an Effective Canva Folder Structure
Think in terms of function when creating your top-level folders. These might include:
- Marketing
- Clients
- Templates
- Presentations
- Archive
Then, create subfolders inside each main folder. For example, under “Marketing,” you might have folders for Social Media, Lead Magnets, and Launch Graphics.
For example, this would be a less helpful top-level Canva folder structure:
Instagram Posts
Facebook Graphics
Email Headers
While this would likely be a more functional primary Canva folder organization:
Marketing
- Social Media (Subfolder)
- Email Campaigns (Subfolder)
- Launch Graphics (Subfolder)
Keep in mind: your folder structure doesn’t have to be perfect right away.
If your Canva account is especially cluttered, just start with a handful of top-level folders that match your core business activities. You can always refine and build out subfolders later.
Your business and content are going to evolve, and so should your folder structure. Set a reminder to review your setup periodically so it continues to support how you work, rather than creating friction.
🗂 Want help setting up a folder system that matches how you work?
That’s exactly what we do inside Clean Up My Canva.
Tip 2: Use the Brand Kit Instead of Folders for Logos and Brand Assets
If you’re storing logos and brand images in folders labeled “Brand Assets,” you’re likely making your workflow harder than it needs to be.
Canva Pro users have access to the Brand Kit feature, and it’s the most efficient and reliable way to store and access your logos, fonts, colour palettes, and brand photos.
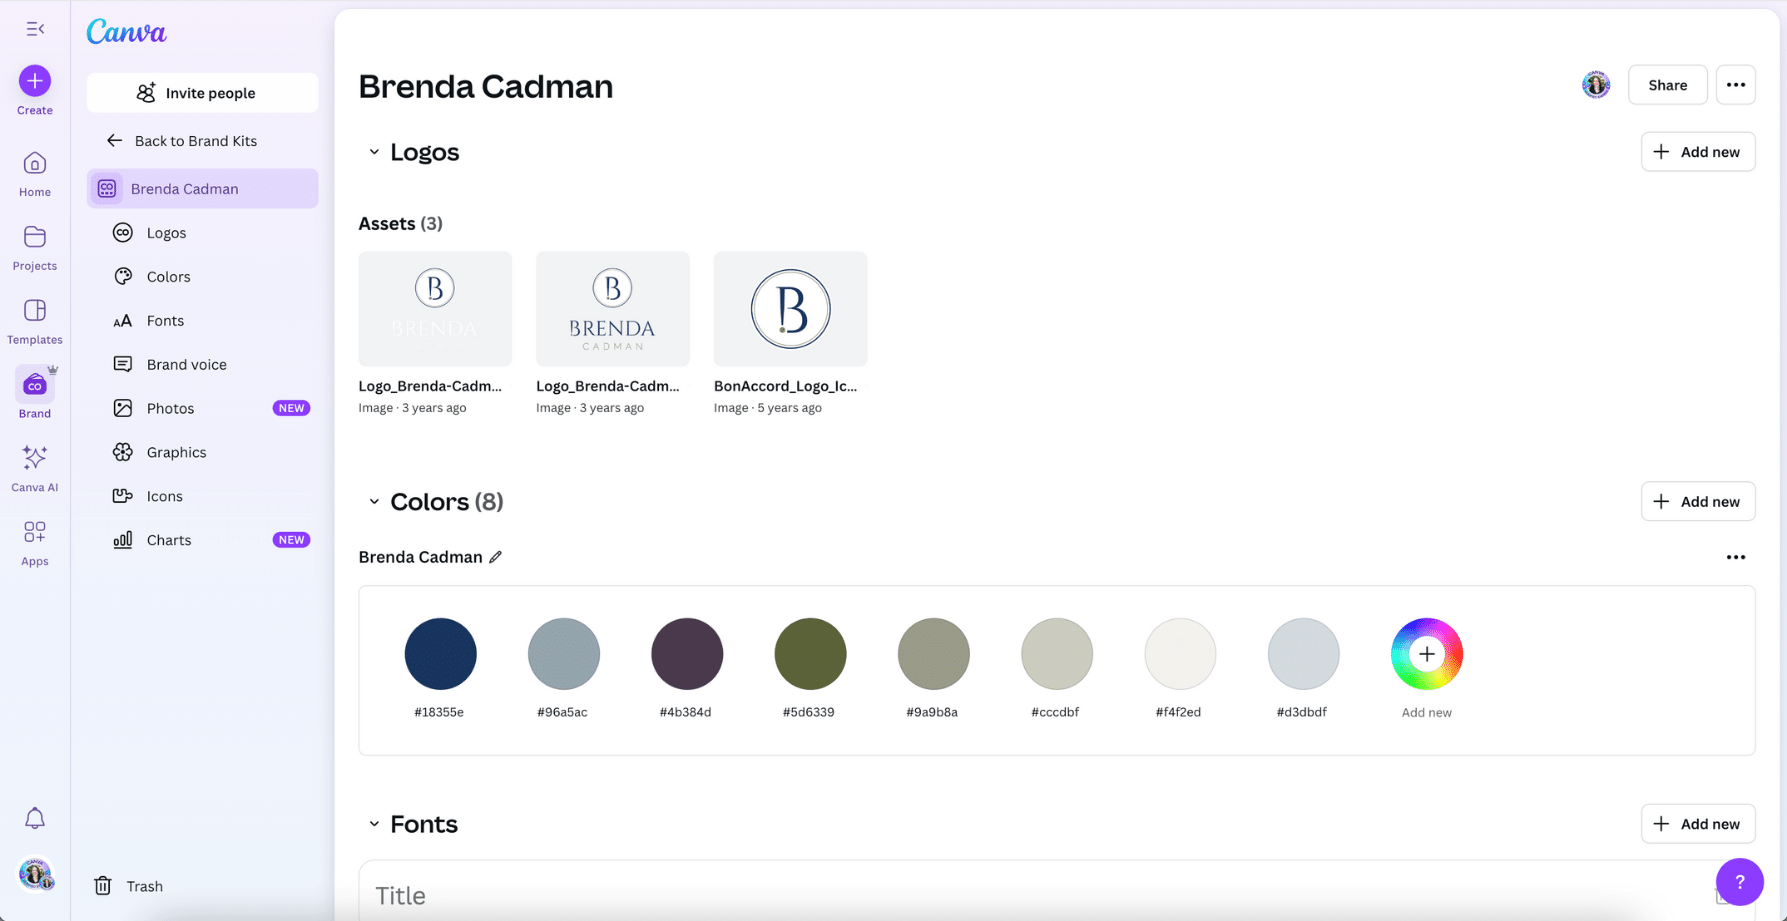
Setting Up Your Canva Brand Kit
To access the Brand Kit, click on Brand from the left-hand navigation on your Canva homepage. From there, you’ll be able to upload multiple versions of your logo (such as full colour, white, black, and stacked options) so you always have the right version available when you need it.
You can also set up your brand colours and Canva allows you to name these colours, which is incredibly helpful for keeping things clear and organized. Some people choose to leave the hex code visible, which can be useful when referencing brand guidelines, collaborating with a designer, or using other platforms that rely on exact hex codes to maintain consistency across different software and touchpoints.
Some prefer to use descriptive names like “Forest Green” or “Sunset Peach,” and others use creative names that reflect their brand personality, like a florist naming colours “Lavender Mist,” “Petal Pink,” or “Stem Green” to align with their theme, or a travel blogger using names like “Coastal Sand,” “Passport Blue,” or “Jet Lag Grey.”
There’s no single right way to name your colours — the goal is to choose a naming system that makes sense to you and supports consistency when working across different templates and design types.
From the same area, you can upload your brand fonts if they don’t already exist in Canva’s available font library and assign them to headings, subheadings, and body text styles. Canva also lets you upload brand imagery, such as stock photos or textures that are used regularly in your content. While this imagery doesn’t behave quite the same as a folder system, it gives you quicker access within the design editor to key visuals.
Can I Create a Brand Kit on Canva’s Free Plan?
All of the brand kit features are available for Canva Pro users, but if you’re using the free version of Canva, you won’t have access to the full Brand Kit.
If that’s the position you’re in, you can still create a “Brand Assets” folder in your Projects area and use it to store your logos, brand photos, and other key visuals. Some people even go a step further and create a reusable “Brand Assets” design file that acts like a visual reference sheet, making it easy to copy and paste those assets into new designs.
While these are helpful workarounds, they do involve more manual effort, and the Brand Kit is designed to eliminate that friction and streamline the entire design process. If you’d like to try it out, you can start a free Canva Pro trial here.
Try Pro for Free
Looking for a free trial of Canva Pro? Access all of Canva’s premium features (like the brand kit!) for 30 days.
Try Pro for Free
Ultimately, using the Brand Kit offers a smoother and more efficient workflow than storing brand assets in folders. For example, if you’re designing and need to pull in your logo, it’s much faster to grab it from the Logos tab within the editor than to navigate through Projects and guess whether you’ve selected the right file. The Brand Kit ensures the correct, current assets are right where you need them.
This isn’t just about branding, it’s also a foundational part of staying organized in Canva. When your logos, colours, and fonts are stored in the Brand Kit instead of scattered across folders or uploads, they become much easier to access right when you need them. This reduces design friction, helps prevent inconsistencies, and allows you to work more efficiently across projects.
It also saves time by eliminating the need to hunt down files or remember where you saved a specific version of your logo or colour code. A well-organized Brand Kit gives your design process a solid anchor, making it faster and easier to create polished, on-brand content with minimal effort.
If you’re not sure how to set up your Canva brand kit, this tutorial will walk you through the whole process.
Ultimately you’ll want to use your folders to organize project content related to your brand assets and then use your Canva Brand Kit to organize your brand’s visual identity. That separation makes everything easier to manage, and helps keep your Canva account streamlined as you grow.
Tip 3: How to Organize Uploads in Canva
Hands down, one of the biggest areas of frustration for Canva users is managing their images.
Many people have chaotic Uploads folders and often end up re-uploading the same image multiple times simply because they can’t find it from the last time they uploaded it. I’ve worked on Canva Organization VIP Days inside accounts with thousands of images, where the same photo shows up over and over again.
Why the Canva Uploads Folder Becomes a Canva Black Hole
Most users don’t realize that you’ve always been able to organize your uploaded images into regular custom folders in Projects, and many people have never taken advantage of that option.
Not only is that still possible (and still a very effective way to keep things organized), but Canva has now also made it possible to create folders directly inside Uploads as well, if that’s the approach you prefer.
It’s a much better system to set up a clear folder structure rather than relying on one giant Uploads folder that will quickly become a bottomless pit. Whether you do that inside of Uploads or your main Projects area is up to you; do what feels most natural for how you work.
For example, I work with a lot of styled stock imagery, so I break my folders down first by the source website, then by the subject of the images. It makes everything easy to find when I’m designing.
How to Organize Your Canva Uploads
Here’s how to organize uploads in Canva more effectively:
If you’re organizing in your regular Projects area, start by creating a top-level folder called something like ‘Media’ or ‘Photos.’ If you’re creating folders directly inside Uploads, you can skip the top-level ‘Media’ folder since it’s already understood that everything there is media.
Then, add subfolders that make sense based on the types of images you typically upload. For example, you might use categories like:
- Headshots
- Stock Photos
- Product Images
- Screenshots
- Brand Photography
Your subfolders will depend on the nature of your business and the kinds of visuals you work with most often. A soap maker might have folders for different collections or seasonal launches, while a wedding planner might organize by different event types or past client galleries.
Then, move items out of your Uploads folder and into the relevant subfolders in your Uploads folder, or in your Projects folders.
You can drag-and-drop images or select multiple at once (by checking them off or dragging to select) and then click the folder icon to move them all at once. For extra help, watch my tutorial on how to move or delete multiple Canva images.
Better yet, upload your files directly into the appropriate folder right from the start. If you’re using custom folders in Projects, you can upload files directly into them to skip Uploads entirely. If you’re organizing within Uploads, you can upload straight into the right folder there.
Even if you prefer to keep everything in Uploads, take advantage of folders so you’re not left scrolling through hundreds of unsorted files. Whether in Uploads or Projects, the goal is to make sure your media has a home where you can find it quickly.
I’ve dedicated an entire module in Clean Up My Canva to organizing your uploads, so you’re not stuck scrolling endlessly or re-uploading the same images over and over.
Tip 4: Organize Your Templates Separately from Your Designs
Before we get into the strategy, it’s helpful to clarify what we mean by a template versus a design. A template is a file meant to be reused, i.e., either a layout you’ve purchased or created that serves as a starting point for future projects. A design is a completed project tied to a specific campaign or piece of content.
It’s really common for Canva users to end up with what I like to call a giant “template graveyard,” aka a messy collection of unused templates, duplicates, and half-customized files that have piled up over time. This can happen when you download dozens of template bundles, often feeling the need to grab everything in a bundle “just in case,” even if it’s not really relevant to your needs or style.
Or maybe you’ve duplicated the same template file again and again (intending to keep it as a base for new projects) but ended up with countless “Copy of” designs that never get used as templates or actual designs.
This clutter not only makes it harder to find what you actually need, it can also lead to accidentally editing or overwriting an original template you wanted to keep.
A strong Canva organization template strategy starts with pruning.
Delete templates you know you’ll never use and clear out the endless duplicates.
Then, separate what’s left into two main types:
- Future use templates: These are purchased bundles or layout ideas you’ve saved for later customization. They belong in a top-level “Templates” folder, organized with subfolders by source, style, or content type.
- Brand templates: These are templates you’ve already customized to your visual brand and intend to reuse. I recommend that you store them right alongside the content they support, like keeping your Instagram quote template inside your Social Media folder so it’s ready when you’re batching posts.
This also means being intentional with your Canva file naming.
It can help to label future use templates so it’s clear at a glance they’re meant as starting points — something like “[Template] Instagram Carousel.” It’s a simple step that keeps you from accidentally grabbing and editing a file you meant to reuse.
If your Canva is currently a mix of everything, start by doing a quick purge to delete templates you know you’ll never use.
Then, take the next step by pulling out the templates from your completed designs. This simple two-step process will make your workspace instantly clearer.
Tip 5: Maintenance Tips for Staying Organized in Canva
It’s one thing to get your Canva account organized, but keeping it that way is where most people struggle. But maintenance doesn’t have to be a big, time-consuming project. In fact, the more consistently you keep up with small habits, the less likely you’ll ever have to do another major overhaul.
Think of it as a quick routine check-up for each area of your Canva account:
- Folders: As your business grows and shifts, your folder structure should evolve too. Every so often, scan through your top-level folders. Are they still serving you? Merge, rename, or archive folders that no longer make sense.
- Uploads: Avoid letting your Uploads become that overflowing in-tray again. Make it a habit to move new files into the right folders or delete images you know you’ll never use. Even five minutes at the end of the week can make a difference.
- Templates: Revisit your Templates folder. Clear out anything that no longer fits your brand or that you realistically won’t use. This prevents the template graveyard from creeping back in.
- Starred Items: If your Starred section becomes overloaded, it loses its value. Check it regularly and remove anything you’re no longer using often so your most important folders and designs stay easy to grab.
- Brand Kit: Make sure your logos, colours, and fonts are still accurate. If you’ve updated your branding, don’t forget to update your Brand Kit too—this keeps your designs consistent without having to hunt down the right assets each time.
The key is consistency over perfection.
A little time spent each week or month tidying up will save you countless hours (and headaches) later on. And remember, your Canva system isn’t meant to be static. As your business changes, your organization should adapt right alongside it.
How to Organize Canva When You’re Overwhelmed
If your Canva account feels like a total disaster and you’re not sure where to begin, you’re far from alone. Many small business owners reach a point where their account is so cluttered that just thinking about cleaning it up feels overwhelming.
The best way to tackle this is to start small. Pick just one area — maybe that’s cleaning up your Uploads, setting up a clear folder structure, or finally pulling out those templates from your completed designs — and focus only on that.
Small, manageable wins build your Canva organizing confidence and keep the momentum going.
If you’d like more structured support, there are a few ways I can help:
- Clean Up My Canva: The Canva Organization Course: A self-paced program that walks you through organizing every part of your Canva account, with clear video lessons and step-by-step systems.
- Canva Organization Consulting: If you’d prefer tailored guidance, book a personalized session where we can troubleshoot and plan your unique setup together.
- Canva Organization VIP Day: For a done-for-you experience, I’ll organize your Canva account for you in a full dedicated day (or sometimes over one to two days, depending on the scope), so you can skip the heavy lifting and start fresh with a clean, easy-to-use workspace.
No matter how overwhelming it feels right now, taking the first small step can completely change how you work in Canva.


